Honeywell 3000 Installation Guide ─ Comprehensive Plan

This guide details the installation of the Honeywell Pro 3000 Series thermostat, offering step-by-step instructions for a smooth setup․ It covers wiring, configuration, and troubleshooting, ensuring optimal performance and energy efficiency for your heating and cooling systems․
Welcome to the Honeywell 3000 Series of smart thermostats! This advanced system offers precise temperature control, energy savings, and convenient remote access via a user-friendly mobile application․ Designed for both heating and cooling systems, the Honeywell 3000 adapts to various configurations, including single-stage, multi-stage, and heat pump setups․
This thermostat isn’t just about comfort; it’s about intelligent home management․ Features include customizable scheduling, geofencing capabilities, and detailed energy reports, empowering you to optimize your home’s climate and reduce utility costs․ The Pro 3000 Series boasts a sleek, modern design that seamlessly integrates into any décor․
This installation guide provides comprehensive instructions to ensure a successful setup․ Whether you’re a seasoned DIY enthusiast or a first-time installer, this manual will walk you through each step, from wiring to Wi-Fi connectivity; Prepare to experience a new level of comfort and control with your Honeywell 3000 thermostat!
Package Contents & Verification
Before beginning installation, carefully verify the contents of your Honeywell 3000 package․ You should find the Honeywell thermostat unit itself, a wallplate for mounting, mounting screws and anchors for secure installation on various wall types, and wire labels to help identify existing wiring during the process․
Additionally, the package includes a quick start guide for a simplified overview and this comprehensive installation manual for detailed instructions․ Some models may also contain a backplate for older wall configurations or additional wiring connectors․
Crucially, inspect all components for any signs of damage incurred during shipping․ If any parts are missing or damaged, do not proceed with installation․ Contact Honeywell support immediately for replacements․ Proper verification now prevents delays and ensures a smooth, trouble-free installation experience․ Retain the packaging for potential returns or warranty claims․
Safety Precautions
Prior to commencing any installation work, disconnect power to your heating and cooling system at the breaker box․ This is paramount to prevent electrical shock and ensure your safety․ Failure to do so could result in serious injury or damage to equipment․
Exercise caution when working with wiring․ If you are uncomfortable or unfamiliar with electrical work, consult a qualified HVAC technician․ Incorrect wiring can lead to system malfunction, fire hazards, or void your warranty․ Always double-check wiring connections before restoring power․
Wear appropriate safety glasses to protect your eyes from debris during drilling or wiring․ Use insulated tools to minimize the risk of electrical contact․ Keep the work area clean and free of obstructions․ Never attempt to install the thermostat in a damp or wet environment․ Follow all local electrical codes and regulations․
Tools Required for Installation
For a successful Honeywell 3000 installation, gather the following tools beforehand․ A Phillips head screwdriver is essential for securing the thermostat and wallplate․ A flathead screwdriver may be needed for certain wiring connections․ Wire strippers are crucial for preparing the thermostat wires, ensuring clean and reliable connections․
A level will guarantee the wallplate is mounted straight, contributing to a professional appearance and accurate temperature readings․ A drill with appropriate drill bits is necessary for creating mounting holes in the wall, particularly for drywall or plaster․ A pencil is useful for marking hole locations․
A voltage tester is highly recommended to verify power is disconnected before working with wiring․ Pliers can assist with bending or manipulating wires․ Finally, have a digital multimeter available for troubleshooting potential wiring issues․ Having these tools readily available will streamline the installation process․
Wallplate Installation
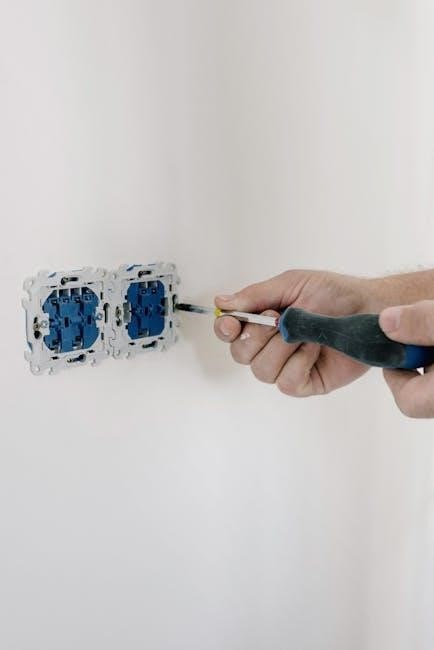
Begin by carefully removing your old thermostat and labeling the existing wires – a crucial step for correct reconnection․ The Honeywell 3000 wallplate serves as the mounting base for the thermostat․ Select a location avoiding direct sunlight, drafts, and areas near heat-generating appliances for accurate temperature sensing․

Position the wallplate on the wall and use a level to ensure it’s perfectly straight․ Mark the screw holes with a pencil․ Drill pilot holes if necessary, using appropriate anchors for drywall or plaster․ Secure the wallplate to the wall using the provided screws․

Carefully connect the thermostat wires to the corresponding terminals on the wallplate, referencing your wiring diagram․ Ensure each wire is firmly inserted and secured․ Double-check all connections before proceeding․ A properly installed wallplate is the foundation for a successful thermostat installation․
Mounting Location Considerations
Selecting the right location for your Honeywell 3000 thermostat is vital for accurate temperature readings and optimal system performance․ Avoid areas exposed to direct sunlight, as this can artificially inflate temperature measurements, leading to inefficient heating or cooling․ Similarly, steer clear of locations near windows, doors, or exterior walls prone to drafts․
Keep the thermostat away from heat-generating appliances like lamps, televisions, or kitchen equipment, as these can also skew readings․ A central, interior wall is generally the best choice․ Ensure the location is easily accessible for adjustments and maintenance․
Maintain a consistent airflow around the thermostat; avoid placing it behind furniture or curtains․ The ideal mounting height is approximately 5 feet from the floor․ Consider the aesthetic impact and ensure the location complements your home’s décor․
Wallplate Wiring Diagram Overview
Understanding the wiring diagram is crucial for a successful Honeywell 3000 installation․ The wallplate typically features terminals labeled R, C, W, Y, G, and potentially others for multi-stage systems․ ‘R’ signifies power, ‘C’ the common wire (often required for consistent power), ‘W’ heating, ‘Y’ cooling, and ‘G’ the fan․

Carefully identify the corresponding wires from your existing thermostat․ Always power off the HVAC system at the breaker before disconnecting any wires! The diagram will illustrate how to connect these wires to the appropriate terminals on the Honeywell wallplate․
For heat pump systems, additional terminals may be present for reversing valve control․ Refer to the specific wiring diagram included with your Honeywell 3000 model, as configurations can vary․ Incorrect wiring can damage the thermostat or your HVAC system, so double-check all connections before proceeding․
Securing the Wallplate to the Wall
Once the wiring is correctly connected, carefully position the Honeywell wallplate against the wall where your old thermostat was located․ Use a level to ensure it’s perfectly straight – this impacts the thermostat’s appearance and functionality․ Mark the screw hole locations with a pencil․
Using appropriate wall anchors (if necessary, depending on your wall type – drywall, plaster, etc․), drill pilot holes at the marked locations․ Ensure the anchors are securely seated in the wall․ Align the wallplate with the holes and use the provided screws to firmly attach it to the wall․
Avoid over-tightening the screws, as this could damage the wallplate or the wall itself․ A snug fit is sufficient․ Gently tug on the wallplate to confirm it’s securely mounted before proceeding with thermostat attachment․ A stable wallplate is essential for long-term reliability․
Power Options & Wiring
The Honeywell 3000 thermostat offers several power options to accommodate various HVAC system configurations․ The most common is 24VAC power supplied through the existing thermostat wiring․ However, a dedicated C-wire (common wire) is often required for consistent power, especially with Wi-Fi enabled models․
If a C-wire isn’t present, alternatives include using a C-wire adapter (sold separately) or utilizing the “power stealing” feature, if supported by your system․ Battery power is also an option for some models, providing a backup or primary power source, though battery life will vary․
Carefully follow the wiring diagrams specific to your chosen power option․ Incorrect wiring can damage the thermostat or your HVAC system․ Always disconnect power to the HVAC system at the breaker before beginning any wiring work․ Double-check all connections before restoring power․
C-Wire Requirement & Alternatives
The Honeywell 3000 thermostat often necessitates a C-wire, providing continuous 24VAC power for reliable operation, particularly with Wi-Fi connectivity and advanced features․ Without a C-wire, the thermostat may intermittently lose power, causing functionality issues․
If your existing wiring lacks a C-wire, several alternatives exist․ A C-wire adapter is a popular solution, borrowing power from other wires in the thermostat cable․ These adapters require careful installation following the manufacturer’s instructions․
Some systems support “power stealing,” where the thermostat draws minimal power from the heating or cooling circuit when the system isn’t actively running․ However, this method isn’t compatible with all HVAC setups․ Carefully assess your system’s compatibility before attempting this․ If unsure, consult a qualified HVAC technician to ensure proper and safe installation․
Battery Installation (if applicable)
Certain Honeywell 3000 models may require battery installation, even with a C-wire connection, to serve as a backup power source during outages or as the primary power source if a C-wire isn’t available․ Typically, these thermostats utilize standard AA alkaline batteries․
To install batteries, locate the battery compartment, usually on the back or side of the thermostat․ Open the compartment cover and insert the batteries according to the polarity markings (+ and -) inside․ Ensure the batteries are securely seated․
The thermostat will usually display a low battery icon when replacement is needed․ Replace batteries promptly to avoid loss of functionality․ Note that battery life varies depending on usage and thermostat features․ Regularly check the battery status to maintain uninterrupted operation․ Refer to the thermostat’s display for specific battery-related alerts and instructions․
Hardwire Power Connection
For a reliable and continuous power supply, a hardwire connection is recommended for the Honeywell 3000 thermostat․ This involves connecting the thermostat directly to a dedicated 24VAC transformer, typically found within your HVAC system’s control panel․ Always disconnect power to the HVAC system at the breaker before commencing any wiring․
Identify the appropriate terminals on both the thermostat and the HVAC system’s control board․ Connect the wires securely, ensuring proper insulation and avoiding loose connections․ Typically, a common (C) wire is essential for consistent power․ If a C-wire isn’t present, consider adding one or utilizing a C-wire adapter․
Double-check all connections against the wiring diagram before restoring power․ Incorrect wiring can damage the thermostat or HVAC system․ Once power is restored, verify the thermostat powers on and operates correctly․ If issues arise, re-examine the wiring and consult a qualified HVAC technician․
System Wiring Configurations
The Honeywell 3000 thermostat supports a variety of HVAC system configurations, requiring specific wiring setups for optimal functionality․ Understanding your system type – single-stage, multi-stage, or heat pump – is crucial for correct installation․ Always disconnect power before beginning any wiring․
For single-stage systems, connect the Rh, Rc, W, Y, and C wires according to the wiring diagram․ Multi-stage systems require additional wiring for each heating and cooling stage (W1, W2, Y1, Y2)․ Heat pump systems utilize different terminal designations, including O/B for reversing valve control and auxiliary heat wiring (AUX/E)․
Carefully consult the wiring diagram provided with your thermostat and HVAC system․ Incorrect wiring can lead to system malfunction or damage․ If unsure, consult a qualified HVAC technician․ Proper wiring ensures accurate temperature control and efficient operation of your heating and cooling equipment․
Wiring for Single-Stage Heating & Cooling
For basic single-stage heating and cooling systems, the Honeywell 3000 utilizes a straightforward wiring configuration․ Begin by identifying the common wire (C), which provides continuous power to the thermostat․ Connect the 24VAC power wires: Rh (heating) and Rc (cooling)․ Ensure these are not jumpered at the furnace if using separate transformers․
The W wire controls the heating system, activating the furnace or boiler․ The Y wire activates the cooling system, engaging the air conditioner or heat pump in cooling mode․ Properly connect these wires to their corresponding terminals on the thermostat wallplate․ Double-check all connections for security․
A secure and correct wiring setup is vital for reliable operation․ Refer to the detailed wiring diagram included with your thermostat․ If you encounter any difficulties or are unsure about any aspect of the wiring process, consult a qualified HVAC professional for assistance․
Wiring for Multi-Stage Heating & Cooling
Multi-stage systems require more complex wiring due to the additional heating and cooling stages․ Beyond the standard Rh, Rc, W, and Y wires, you’ll encounter wires for second-stage heating (W2) and cooling (Y2)․ Proper identification is crucial; miswiring can lead to inefficient operation or system damage․
The thermostat needs to recognize each stage to control the system effectively․ Connect W2 to the second-stage heating terminal and Y2 to the second-stage cooling terminal․ Verify the furnace control board supports multi-stage operation and is configured accordingly․ Some systems may also utilize an O/B wire for reversing valve control in heat pump applications․
Carefully review the system’s wiring diagram and the Honeywell 3000’s wiring guide․ If you’re unfamiliar with multi-stage wiring, seeking assistance from a qualified HVAC technician is highly recommended to ensure a safe and functional installation․
Wiring for Heat Pump Systems
Heat pump wiring differs significantly from conventional systems, requiring careful attention to detail․ Key wires include Rh, Rc, Y, W, and often, O/B․ The O/B wire controls the reversing valve, switching between heating and cooling modes – determine if your system uses ‘O’ (energize to cool) or ‘B’ (energize to heat)․
Properly identifying the O/B wire is critical; incorrect wiring will result in the system operating in the wrong mode․ Some heat pumps also utilize auxiliary heat wires (W2/Aux) for supplemental heating during colder temperatures․ Ensure these are connected to the appropriate terminals on the thermostat․
Consult your heat pump’s wiring diagram and the Honeywell 3000’s specific instructions for heat pump configurations․ If your system includes a thermal protection control (TPC), connect it as indicated in the system documentation․ Professional installation is recommended if you are unfamiliar with heat pump wiring․
Initial Thermostat Setup
After completing the wiring, the initial thermostat setup begins with powering on the device․ Once powered, the Honeywell 3000 will guide you through a series of essential configuration steps․ The first prompt typically involves selecting your preferred language – ensure this is set correctly for optimal usability․
Next, you’ll be asked to set the date and time․ Accurate date and time settings are crucial for scheduling features and maintaining proper system logs․ Follow the on-screen instructions to input this information precisely․ The thermostat may offer automatic time synchronization via Wi-Fi, which can be configured later․

Verify the display is functioning correctly and that all icons are visible․ This initial setup prepares the thermostat for system configuration, where you’ll define your heating and cooling system type․ A successful initial setup is vital for seamless operation․
Powering On the Thermostat
With the wiring securely connected, powering on the Honeywell 3000 thermostat is a straightforward process․ If utilizing battery power, ensure the batteries are correctly installed with the proper polarity before proceeding․ For hardwired installations, verify the power switch to the HVAC system is in the ‘on’ position․
Upon applying power, the thermostat display should illuminate, initiating a self-test sequence․ This initial startup may take a few moments as the system checks its internal components; Observe the screen for any error messages during this phase; if errors appear, consult the troubleshooting section of this guide․
The thermostat will then typically display a welcome screen or prompt you to begin the setup process․ If the display remains blank, double-check the wiring connections and power source․ A successful power-on indicates the thermostat is ready for initial configuration, including language and date/time settings․
Language & Date/Time Settings
Following successful power-up, the Honeywell 3000 thermostat will prompt you to configure the language and date/time settings․ These initial settings ensure accurate display and proper operation of the thermostat’s features; Navigate to the language selection screen using the thermostat’s touchscreen or buttons․
Select your preferred language from the available options․ Once chosen, confirm your selection to proceed․ Next, the thermostat will guide you through setting the current date and time․ Accurate date and time settings are crucial for scheduling and historical data tracking․
Use the on-screen controls to adjust the month, day, year, hour, and minute․ Confirm each setting to ensure accuracy․ Some models may offer automatic date/time synchronization via Wi-Fi, which can be configured later during the network setup process․ Proper language and date/time settings are fundamental for a user-friendly experience․
System Configuration & Calibration
After initial setup, configuring your Honeywell 3000 to match your specific heating and cooling system is vital․ Begin by selecting the correct system type – options typically include forced air, heat pump, or radiant heat․ Accurate selection ensures proper control and efficiency․
The thermostat will then guide you through configuring system parameters like the number of heating and cooling stages․ This step optimizes performance based on your equipment’s capabilities․ Following system type selection, temperature sensor calibration is recommended․
Compare the thermostat’s reading to a trusted thermometer․ If discrepancies exist, use the calibration feature to adjust the thermostat’s internal sensors․ This ensures accurate temperature readings and comfortable climate control․ Precise calibration is key to maximizing energy savings and maintaining desired comfort levels throughout your home․
Heating & Cooling System Type Selection
Accurate system type selection is crucial for optimal Honeywell 3000 performance․ The thermostat presents several options, including forced air (furnace and AC), heat pump, radiant heat, and others․ Carefully identify your home’s heating and cooling configuration before proceeding․
Forced air systems are the most common, utilizing a furnace for heating and an air conditioner for cooling․ Heat pumps provide both heating and cooling, transferring heat rather than generating it․ Radiant systems use hot water or steam to distribute heat․
The thermostat’s menu will guide you through these choices․ Selecting the incorrect system type can lead to inefficient operation and inaccurate temperature control․ If unsure, consult your HVAC system’s documentation or a qualified technician․ Proper selection ensures the thermostat correctly manages your equipment, maximizing comfort and energy savings․
Calibration of Temperature Sensors
Ensuring accurate temperature readings is vital for consistent comfort․ The Honeywell 3000 allows for temperature sensor calibration, compensating for potential inaccuracies due to thermostat location or environmental factors․ This process fine-tunes the thermostat’s perception of room temperature․
Access the calibration menu through the thermostat’s settings․ You’ll likely be prompted to compare the displayed temperature with a trusted external thermometer․ Adjust the thermostat’s reading up or down in small increments until it matches the reference thermometer․
Repeat this process in multiple locations within the room to account for temperature variations․ Calibration improves the thermostat’s ability to maintain your desired temperature, leading to greater comfort and potentially reduced energy consumption․ Regular calibration, especially after relocation, is recommended for optimal performance․

Wi-Fi Connectivity & App Setup
Connecting your Honeywell 3000 thermostat to Wi-Fi unlocks remote control and advanced features via the Honeywell Home app․ Begin by downloading the app from your device’s app store and creating an account․
On the thermostat, navigate to the network settings and select your Wi-Fi network․ Enter your password when prompted․ The thermostat will attempt to connect, displaying a confirmation message upon successful connection․
Within the Honeywell Home app, follow the on-screen instructions to add your thermostat․ The app will guide you through the process, potentially requiring you to scan a QR code on the thermostat or manually enter its serial number․ Once added, you can control your home’s temperature remotely, create schedules, and receive alerts․
Troubleshooting Common Installation Issues
If your Honeywell 3000 thermostat isn’t powering on, verify the C-wire connection or battery installation (if applicable)․ A missing or improperly connected C-wire is a frequent cause․ Double-check all wiring connections at both the thermostat and the HVAC system, ensuring wires are securely fastened․
For Wi-Fi connectivity problems, confirm your network password is correct and the thermostat is within range of your router․ Restarting both the thermostat and router can often resolve connection issues․ Ensure your router’s firewall isn’t blocking the thermostat’s access․
If the thermostat displays incorrect temperature readings, recalibrate the temperature sensors within the settings menu․ If issues persist, consult the full installation manual or Honeywell’s support website for further assistance and detailed troubleshooting steps․
Thermostat Specifications
The Honeywell 3000 Series thermostats are designed for compatibility with standard 24VAC heating and cooling systems․ They support single-stage and multi-stage heating/cooling configurations, including conventional and heat pump systems․ Display resolution is typically 320×240 pixels, offering clear visibility of settings and temperature readings․
Operating temperature range is generally 32°F to 104°F (0°C to 40°C), with humidity operating range of 5% to 95% non-condensing․ Power requirements vary depending on the model, but typically include 24VAC common and battery backup options․
Connectivity features include Wi-Fi (802․11 b/g/n) for remote access and control via the Honeywell Home app․ Dimensions are approximately 4․7 x 3․1 x 1․2 inches․ Refer to the specific model number (e․g․, TH9320WF5003) for precise specifications and detailed technical information․